
Maximizing alpine agility hinges on understanding the biomechanical trade-offs between footwear components, not just minimizing weight.
- Stiff soles provide superior edging on technical rock, while flexible soles offer better friction for smearing on slabs.
- Ankle stability is influenced more by a boot’s stack height (the “lever arm” effect) than by cuff height alone.
Recommendation: Prioritize boot selection based on a data-driven analysis of sole geometry, midsole rebound, and rubber compound performance for your specific terrain objectives.
For the fast-packer and alpine hiker, speed is a function of efficiency, and efficiency begins at the point of contact with the ground. The common wisdom often defaults to a simple equation: lighter boots equal greater speed. While mass is undeniably a factor in energy expenditure, this view overlooks the complex interplay of forces that govern agility on technical, uneven terrain. True mastery of alpine movement requires a deeper understanding of footwear as a high-performance tool, where every element—from torsional rigidity to midsole rebound—is a variable in a complex performance equation.
Most discussions remain superficial, focusing on generic advice like “good ankle support” or “aggressive lugs.” But for the mountain athlete, these are merely outcomes. The critical questions lie in the engineering and biomechanics that produce them. Why can an ultralight boot sometimes lead to more fatigue than a heavier model? How does the durometer of a rubber compound translate to grip on wet, leaf-strewn rock? This is where performance is won or lost—in the technical details that dictate how a boot interacts with both your body and the mountain.
This guide moves beyond the platitudes. We will deconstruct the core principles of high-performance footwear, examining the specific design choices that impact stability, precision, and durability. Instead of offering a simple “best of” list, we will provide a decision-making framework based on performance metrics. The objective is not just to help you choose a boot, but to empower you to analyze gear like an engineer, turning your footwear selection into a calculated advantage for maximizing speed and precision on challenging alpine trails.
This article dissects the critical components of high-performance hiking boots to provide a clear, metric-driven framework. The following sections will guide you through the key decisions and technical knowledge needed to optimize your footwear for alpine agility.
Summary: High-Performance Hiking Boots for Alpine Agility
- Why Lightweight Boots May Increase Ankle Fatigue on Multi-Day Treks?
- How to Break In Synthetic Hiking Boots in Less Than 24 Hours?
- Stiff vs Flexible Soles: Which Is Better for Scrambling Over Boulders?
- The Sizing Mistake That Causes Black Toenails on Steep Descents
- When to Retire High-Performance Boots Before the Midsole Collapses?
- Approach Shoes vs Hiking Boots: Which Is Safer for Ridge Scrambling?
- Megagrip vs Arctic Grip: Which Compound Handles Wet Autumn Leaves Best?
- How to Maintain Ankle Stability on Uneven Ground Without Restricting Movement?
Why Lightweight Boots May Increase Ankle Fatigue on Multi-Day Treks?
The pursuit of “fast and light” often leads athletes to prioritize weight above all else. However, shedding grams can come at a biomechanical cost. Extremely lightweight, minimalist boots often lack the structural support found in more traditional designs. This forces the small stabilizer muscles in your feet and ankles to work overtime, making thousands of micro-corrections to maintain balance on uneven terrain. Over the course of a long day, this leads to what is known as micro-correction fatigue, an exhaustion of the neuromuscular system that a more supportive boot would have mitigated.
Furthermore, this minimalist approach can lead to proprioceptive overload. Proprioception is your body’s ability to sense its position in space. While some ground-feel is beneficial for precise footwork, excessive sensory input from minimalist footwear can be mentally exhausting. The constant stream of information from every rock and root requires significant cognitive processing, contributing to overall fatigue on multi-day treks. A boot with a moderate level of cushioning and support acts as a filter, dampening a significant portion of this sensory noise and allowing you to focus your energy on forward momentum.
It’s crucial to monitor for signs that your lightweight boots are insufficient for the load and terrain. Key indicators include:
- Micro-correction fatigue: Your larger leg muscles may feel fine, but the stabilizer muscles in your feet and ankles feel exhausted after just a few hours.
- Arch collapse: The boot’s midsole foam is “packed out” and no longer provides adequate support. You can test this by pressing into the midsole with your thumbs; if it doesn’t spring back quickly, the structure is compromised.
- Proprioceptive overload: A distinct feeling of mental exhaustion specifically related to foot placement and ankle awareness, indicating your brain is working too hard to process sensory input.
Ultimately, the ideal boot strikes a balance. It should be light enough to not feel cumbersome but provide enough structure to offload the constant work from your stabilizer muscles, preserving your energy for the long haul.
How to Break In Synthetic Hiking Boots in Less Than 24 Hours?
The era of spending weeks breaking in stiff leather boots is largely over, thanks to modern synthetic materials and advanced construction techniques. High-performance synthetic boots, often made with TPU (thermoplastic polyurethane) overlays and nylon uppers, are designed to offer a near-perfect fit out of the box. However, a rapid break-in protocol is still essential to mold the boot to the unique contours of your foot and identify potential hot spots before you’re miles from the trailhead.
Unlike leather, which stretches and conforms over time, synthetics achieve their fit by heat-molding the internal foams and fabrics around your foot. The goal of a quick break-in is to accelerate this process. Wearing thick hiking socks increases the volume of your foot, creating the necessary pressure and heat to customize the boot’s interior. This is particularly effective in shaping the padded ankle collar and tongue for a secure, comfortable fit.
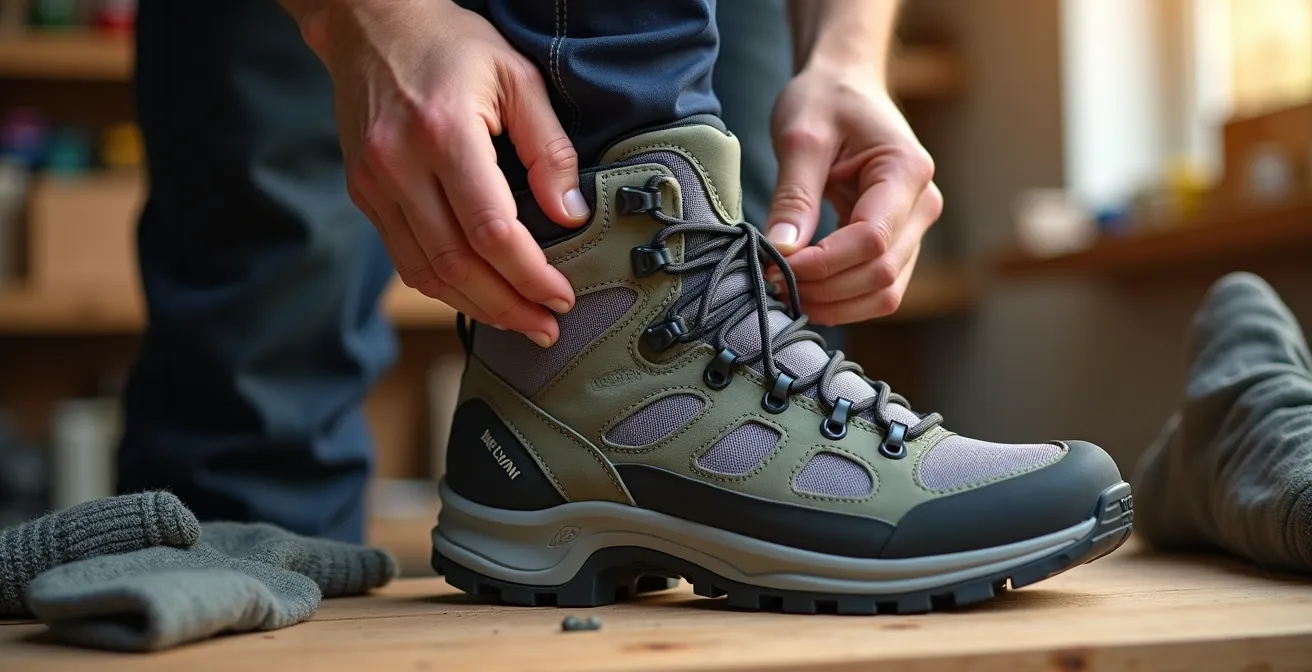
As the image above illustrates, the focus is on the interaction between your foot and the boot’s structural elements. The following protocol can effectively break in a pair of synthetic boots in a single day:
- Start with short walks: Begin with a 10-15 minute walk on a varied surface, like up and down a flight of stairs or around your block. This initial test helps you evaluate the overall comfort and identify any immediate points of friction.
- Wear thick socks: Use the same thick, high-quality socks you plan to hike in. This not only aids the molding process but also ensures you are testing the fit under realistic conditions.
- Carry moleskin: During your break-in walks, have moleskin or blister tape readily available. The moment you feel any discomfort or a “hot spot” beginning to form, stop immediately and apply it. Preventing a blister is far easier than treating one.
- Gradually increase duration: After the initial walk, take a break and then embark on progressively longer walks throughout the day. Aim for a few 30-60 minute sessions, ideally carrying a light pack to simulate hiking loads.
By the end of the day, the boot’s internal padding should be well-molded to your foot’s anatomy. This quick yet thorough process ensures that your new high-performance boots are an asset, not a liability, from the very first step of your adventure.
Stiff vs Flexible Soles: Which Is Better for Scrambling Over Boulders?
The choice between a stiff and a flexible sole is one of the most critical decisions for an alpine athlete, as it directly impacts performance on technical rock. There is no single “better” option; the optimal choice depends entirely on the type of rock and the scrambling technique required. A stiff-soled boot, often incorporating a nylon or TPU shank, provides a rigid platform that excels at edging. This technique involves concentrating your entire body weight onto a very small, precise point, such as a tiny ledge or rock crystal. The sole’s rigidity prevents it from flexing under load, allowing for secure purchase on features that a flexible sole would simply fold over.
In contrast, a flexible sole is superior for smearing. This technique is used on low-angle, featured slabs where maximizing friction is the primary goal. A flexible sole can bend and conform to the rock’s surface, increasing the amount of rubber in contact with the stone. This creates significantly more grip than a stiff sole, which would only make contact at a few high points. However, this same flexibility becomes a liability when trying to edge, as it fails to provide the stable platform needed for precise footwork on small holds.
To address this trade-off, many modern high-performance boots feature a hybrid design, often a semi-stiff sole with a dedicated “climbing zone” under the big toe. This area typically uses smoother, stickier rubber and allows for more precise toe placements, mimicking the performance of an approach shoe.
Case Study: La Sportiva Trango Tech’s Rock-First Design
The La Sportiva Trango Tech was specifically engineered for climbers who prioritize rock performance over deep snow security. These boots feature a prominent climbing zone under the big toe that emulates the precision of an approach shoe while retaining enough torsional stiffness for scrambling and carrying a pack. Field testing on technical alpine rock routes confirmed its superior performance in scenarios where precise, confident foot placements on small edges were more critical than all-out support.
The following table, based on an analysis of mountaineering boot performance, summarizes the ideal applications for each sole type.
| Sole Type | Best For | Rock Type | Key Advantage |
|---|---|---|---|
| Stiff Sole | Edging | Small ledges, crystals | Concentrates body weight without flexing |
| Flexible Sole | Smearing | Low-angle slabs | Maximizes rubber-to-rock friction |
| Semi-Stiff with Climbing Zone | Mixed terrain | Variable surfaces | Precise foot placements with toe flexibility |
For the alpine scrambler, the choice is therefore a strategic one. Analyze the predominate rock type of your objective. If the route involves extensive edging on technical, featured rock, a stiffer boot is the superior tool. If it’s a long, low-angle slab, a more flexible sole will provide greater security and efficiency.
The Sizing Mistake That Causes Black Toenails on Steep Descents
Subungual hematoma, or “black toenail,” is a common and painful affliction for mountain athletes, yet it is almost always preventable. The issue is rarely caused by a boot that is simply “too small.” Instead, it is the result of a specific sizing failure: inadequate heel lock. During a steep descent, gravity and momentum cause your foot to slide forward inside the boot. If your heel is not securely locked into the boot’s heel cup, your entire foot will shift with each step, causing your toes to repeatedly slam into the front of the toebox. Over thousands of steps, this repetitive impact damages the nail bed and causes bleeding underneath the nail.
The common advice to ensure a “thumb’s width” of space in front of the toes is only half the solution. While that space is necessary, it is useless without a locked-in heel. The primary focus during a boot fitting should be on securing the rear of the foot. When trying on boots, you should lace them up snugly and then attempt to lift your heel. There should be minimal to no heel lift. If your heel moves up and down more than a quarter of an inch, the boot’s heel pocket is the wrong shape or volume for your foot, regardless of how much room is in the toebox.
To properly assess fit, you need to simulate the forces of a descent. Find an incline board or a small ramp in the store. Stand on it facing downhill and stomp your feet lightly. Does your foot slide forward? Do your toes touch the end? If so, the boot is not a good fit. A proper fitting protocol should be an active process; in fact, a fitting protocol from the Journal of Athletic Training recommends at least 10-15 minutes of walking and movement to properly evaluate a shoe. This gives your foot time to settle and reveals fit issues that aren’t apparent when standing still.
Lacing techniques can also play a major role. Using a “surgeon’s knot” or a “heel lock” lacing technique over the ankle can help pull your heel back into the pocket and prevent forward-and-back motion. Ultimately, preventing black toenails is not about sizing up, but about locking in.
When to Retire High-Performance Boots Before the Midsole Collapses?
For a mountain athlete, a hiking boot is a piece of precision equipment, and like any equipment, its performance degrades over time. The most critical and often overlooked point of failure is not the worn-out outsole or a tear in the upper, but the slow, insidious collapse of the EVA (ethylene vinyl acetate) or PU (polyurethane) midsole. The midsole is the heart of the boot’s performance, providing cushioning, support, and energy return. When it breaks down, the boot loses its ability to absorb impact and stabilize the foot, dramatically increasing the risk of fatigue and injury.
Relying solely on mileage is an unreliable metric for retirement, as factors like user weight, terrain, and temperature all affect midsole longevity. Instead, athletes should learn to identify the physical signs of a “dead” midsole. The most telling indicator is a loss of midsole rebound. A healthy midsole feels springy and resilient, returning energy with each step. As the foam’s internal structure breaks down, it becomes compressed and loses this quality, feeling mushy and unresponsive underfoot. This forces your joints and muscles to absorb more impact, leading to premature fatigue.
There are several diagnostic tests you can perform to assess the health of your boot’s midsole before a catastrophic failure on the trail:
- The Midsole Rebound Test: Press firmly into the EVA foam on the sides of the boot with your thumbs. Healthy foam will compress and immediately spring back. A “dead” midsole will stay compressed for a moment or feel mushy and unresponsive.
- Check for Compression Wrinkles: Inspect the sides of the midsole for deep, horizontal lines. While some light wrinkling is normal, deep, pronounced creases are a clear sign of internal breakdown.
- Test Torsional Rigidity: Grab the boot by the heel and toe and twist it. Compare its resistance to that of a new boot (if possible). A significant loss in torsional rigidity indicates that the internal shank and midsole structure are compromised, reducing stability on uneven ground.
- Inspect Outsole Wear: Uneven or excessive wear on the outsole lugs, particularly at the heel and forefoot, can indicate that the collapsed midsole is causing changes in your gait.
Retiring a pair of boots that still “look” good can feel wasteful, but continuing to use footwear with a collapsed midsole is a false economy. The cost of reduced performance and increased injury risk far outweighs the price of a new pair of boots.
Approach Shoes vs Hiking Boots: Which Is Safer for Ridge Scrambling?
The choice between approach shoes and hiking boots for ridge scrambling is a classic alpine dilemma, with safety considerations pulling in both directions. There is no universally “safer” option; safety is a direct result of matching the tool to the specific challenges of the terrain, exposure, and conditions. The decision requires a nuanced analysis of the trade-offs between precision and protection.
Approach shoes are purpose-built for rock performance. With their sticky rubber soles, low-profile toeboxes, and snug fit, they offer unparalleled precision and sensitivity for technical climbing moves. On high-quality, solid granite with significant exposure, the ability to confidently place your foot on a tiny edge can be the single most important safety factor. In this context, the superior climbing ability of an approach shoe makes it the safer choice, as a slip would have severe consequences. Their lighter weight also reduces fatigue on long traverses, which is a significant safety benefit.
However, that same sensitivity becomes a liability on loose, chossy, or unpredictable terrain. Hiking boots, with their stiffer soles, more protective rands, and greater ankle support, offer superior protection from rockfall and unstable ground. The added torsional rigidity of a boot prevents your foot from twisting when a foothold gives way, and a sturdy ankle cuff can deflect impacts from shifting scree. Furthermore, in wet, cold, or icy conditions, the waterproofing and insulation of a boot are non-negotiable safety features that most approach shoes lack.
Case Study: The Arc’teryx Acrux and the Hybrid Solution
The evolution of technical footwear is blurring the lines between categories. The Arc’teryx Acrux line represents this hybrid approach, merging the precision of a climbing shoe with the support of a mountain boot. Field tests on varied alpine terrain show this design excels at terrain transitions—from glacier travel to technical rock scrambling. It maintains the sticky rubber and rockered sole of an approach shoe while providing the ankle support, waterproofing, and durability needed for serious mountain routes, offering a “best of both worlds” solution for certain objectives.
Action Plan: Your Footwear Decision Framework for Ridge Scrambling
- Assess the Exposure Level: High exposure with consequential falls favors the precision of approach shoes for secure foot placement on technical rock.
- Consider Traverse Length and Pack Weight: Longer ridges and heavier packs increase fatigue; the lighter weight of approach shoes can be a significant safety advantage in these scenarios.
- Evaluate Rock Quality: Solid, reliable granite is ideal for approach shoes. Loose, broken, or scree-covered terrain demands the protection and stability of a hiking boot.
- Check Weather and Ground Conditions: Any chance of wet, snowy, or icy conditions immediately tips the scales in favor of waterproof, more supportive boots.
- Analyze Your Personal Weaknesses: If you have a history of ankle instability, the added support of a boot might be the deciding factor, even on perfect terrain.
Ultimately, the safest choice is the one that best addresses the primary hazard of the route. If the main danger is a slip on technical rock, approach shoes are safer. If the main danger is unstable terrain or environmental conditions, boots are safer.
Megagrip vs Arctic Grip: Which Compound Handles Wet Autumn Leaves Best?
For the mountain athlete, traction is paramount, yet not all grip is created equal. The performance of a boot’s outsole is determined by two main factors: the lug pattern (mechanical grip) and the rubber compound (frictional grip). When dealing with slick surfaces like wet autumn leaves, the rubber compound becomes the dominant factor. Two of Vibram’s most popular compounds, Megagrip and Arctic Grip, are often discussed, but they are engineered for fundamentally different conditions.
Vibram Megagrip is a highly versatile, all-conditions compound. Its key characteristic is a balanced durometer (a measure of rubber hardness) that provides excellent sticky friction on both wet and dry rock without wearing out too quickly. When paired with deep, widely spaced lugs, it performs well in mud and on general wet surfaces because the lugs can bite into the terrain. For example, independent testing of the Scarpa Moraine showed that its 4mm lugs provided surprisingly effective traction on wet rocks and scree. However, on a uniform, slick surface like a carpet of wet leaves, the lugs have nothing to bite into, and performance relies solely on the rubber’s friction.
Vibram Arctic Grip, on the other hand, is a specialist compound designed explicitly for wet ice. It incorporates hard, textured thermochromatic lugs that dramatically increase friction on icy surfaces. While revolutionary on ice, these hard lugs are less effective on other surfaces. On wet leaves, their hardness prevents them from conforming to micro-textures, reducing the total surface area contact and thus limiting frictional grip. Softer compounds, like La Sportiva’s FriXion Blue or Scarpa’s PRESA, often provide superior performance in cool, damp, non-icy conditions due to their ability to maximize rubber-to-surface contact.
This comparative analysis of popular rubber compounds highlights their ideal operating windows.
| Compound | Durometer | Best Temperature | Wet Leaf Performance |
|---|---|---|---|
| Megagrip | Balanced | All temperatures | Good with deep lugs |
| Arctic Grip | Hard lugs | Cold/Ice | Limited on leaves |
| FriXion Blue | Softer | Cool/Damp | Superior friction |
| PRESA | Soft | Variable | Excellent grip |
For wet autumn leaves, a boot with a softer, high-friction compound and deep, sharp-edged lugs will outperform a specialized ice-gripping compound. Megagrip remains a strong all-around choice, but for peak performance in these specific conditions, a softer compound like FriXion Blue or PRESA offers a measurable advantage in friction.
Key Takeaways
- Footwear performance is a system of trade-offs; lightweight design can increase muscle fatigue, and stiff soles excel at edging but fail at smearing.
- Ankle stability is primarily dictated by a low stack height (reducing the lever arm effect), not necessarily a high cuff.
- The most critical failure point of a boot is often the invisible collapse of the midsole foam, which should be assessed via rebound and rigidity tests, not just mileage.
How to Maintain Ankle Stability on Uneven Ground Without Restricting Movement?
The traditional approach to ankle stability has been to immobilize the joint with a high, stiff boot cuff. While this provides a sense of security, it can be counterproductive for an agile athlete. Restricting the ankle’s natural range of motion can hinder precise foot placements, create an unnatural gait, and transfer stress to the knee. A more effective, modern approach to stability focuses on the boot’s foundational geometry rather than its cuff height. The key principle is to minimize the lever arm effect.
Imagine your ankle as a fulcrum. The higher the stack height of your boot’s sole (the distance between your foot and the ground), the longer the lever acting on that fulcrum. A small, unexpected tilt on a rock or root creates a much larger and more powerful twisting force on your ankle in a high-platform boot than it would in a low-profile one. This is pure physics. By selecting a boot with a lower overall stack height, you geometrically reduce the forces that cause an ankle to roll.
A lower platform reduces the lever arm on the ankle, making it geometrically less likely to roll.
– Technical analysis, Hiking boot stability principles
In addition to a low stack height, a wider sole platform further enhances stability. A broader base of support at the heel and forefoot makes the boot inherently more resistant to tipping. This combination of a low and wide foundation creates a stable chassis that allows the ankle to move naturally and react to terrain, rather than being locked in a rigid cast.
This visual comparison of sole geometries demonstrates the principle clearly. The boot with the lowest stack height and widest flare offers the most inherent stability, independent of its cuff design. This allows for the use of a more flexible, lower-cut ankle cuff that provides protection from abrasion without restricting the crucial range of motion needed for agile, dynamic movement.
Therefore, to maintain stability without sacrificing agility, the performance-focused athlete should prioritize boots with a low stack height and a wide sole footprint. This approach provides a foundation of passive safety, allowing your ankle to function as it was designed: as a strong, flexible, and highly adaptive joint.