Contrary to popular belief, simply adding a thick insole is not the key to warm feet; it can even make them colder. True warmth comes from creating a balanced thermal system that actively combats conductive heat loss and manages moisture.
- Conductive heat loss to the frozen ground is the primary reason for cold feet, not ambient air temperature.
- Improperly fitted insoles compress insulation and restrict blood flow, negating any thermal benefit.
- Non-breathable materials like aluminum foil create a vapor barrier, leading to sweat, dampness, and rapid heat loss.
Recommendation: Stop treating insoles as accessories. Instead, select and fit them as a critical component of your footwear system, prioritizing ground insulation and moisture management to maintain a stable microclimate for your feet.
The biting cold that seeps through the soles of your boots is a familiar misery for any winter hiker or hunter. It starts as a dull ache in the toes and quickly escalates into a painful, distracting numbness that can ruin an otherwise perfect day outdoors. The conventional wisdom is to double up on thick wool socks, a “solution” that often backfires by compressing insulation, cutting off circulation, and turning your boots into a cramped, ineffective prison for your feet. This common experience highlights a fundamental misunderstanding of how feet lose heat in cold environments.
Your feet are not passive blocks of tissue; they are complex thermoregulatory engines. The real battle for warmth isn’t just about adding layers. It’s a technical challenge against powerful laws of physics, primarily conductive heat loss to the frozen ground and the insidious effects of moisture. Most standard boot insoles are little more than foam placeholders, offering negligible defense against the relentless cold sinking into your soles. To truly solve the problem of cold feet, we must move beyond the simple idea of “insulation” and start thinking about our footwear as an integrated thermal system.
This is where the science of a high-performance thermal insole becomes critical. But the answer isn’t as simple as finding the “warmest” material. It involves a precise interplay of material science, volumetric fit, moisture management, and biomechanical support. This guide will deconstruct the physiological and physical principles at play, revealing how a correctly chosen and fitted thermal insole doesn’t just add a layer—it fundamentally re-engineers your boot’s microclimate to keep you warm, dry, and comfortable in the harshest sub-zero conditions.
Summary: The Complete Guide to Engineering Warmth with Thermal Insoles
- Wool vs Aerogel Insoles: Which Retains Heat Better When Static?
- How to Fit Thermal Insoles Without Cutting off Circulation?
- Why Aluminum-Faced Insoles Can Cause Sweaty Feet and How to Fix It?
- The Ground-Conduction Error That Freezes Feet Even in Good Boots
- When to Switch to Thermal Insoles for the Winter Season?
- How to Match Insole Arch Height to Your Foot Profile Correctly?
- Why Most Modern Boots Fail at the Flex Point Within 12 Months?
- Finalizing Your Footwear System: Why Details Like Laces Matter
Wool vs Aerogel Insoles: Which Retains Heat Better When Static?
When you’re stationary—whether sitting in a tree stand or pausing on a trail—your feet generate minimal heat, making the insulating properties of your insole paramount. The debate often centers on two primary materials: traditional felted wool and modern aerogel. Wool is the time-tested standard, a natural fiber renowned for its ability to insulate even when damp and for its excellent breathability. Its effectiveness comes from the millions of tiny air pockets trapped within its crimped fibers, which create a substantial barrier to heat transfer.
Aerogel, however, operates on another level of thermal performance. This synthetic material, originally developed for aerospace applications, is composed of over 98% air trapped in a nanoporous solid structure. The result is one of the least dense and most effective insulators known. According to technical data, the NASA-developed aerogel technology requires 50% to 80% less thickness than other insulation materials to achieve the same thermal resistance. This is a game-changer inside a boot, where space is at a premium.

As seen in the material comparison, the structures are fundamentally different. While wool relies on a matrix of fibers, aerogel’s strength is its near-weightless, air-filled composition. In a real-world field test, a hunter using Oboz insoles with an aerogel barrier reported that his previously cold-prone boots maintained warmth during extended periods of static activity in the snow. For static situations where maximum insulation with minimum bulk is the goal, aerogel holds a clear scientific advantage. However, wool’s superior moisture-wicking ability may make it a better choice for high-exertion activities with temperature fluctuations.
How to Fit Thermal Insoles Without Cutting off Circulation?
The most common mistake when upgrading to thermal insoles is choosing one that is too thick for the boot. This error in judgment creates a condition called volumetric compression. By adding too much volume, the insole presses your foot against the top and sides of the boot, compressing the loft in your socks and the insulation in the boot itself. Trapped air is the essence of insulation; when it’s squeezed out, the thermal resistance plummets. Worse, this pressure restricts blood flow to your feet, triggering vasoconstriction—the body’s natural response to conserve core heat, which drastically reduces warmth in your extremities.
An insole that’s too thick can paradoxically make your feet colder than the flimsy stock insole it replaced. Research from the University of Wisconsin has shown that effective insulation, which requires uncompressed space, can result in an over 50% heat loss reduction, a benefit that is completely lost with a poor fit. The goal is to replace the boot’s original insole with a thermal model that occupies a nearly identical volume. It should support your foot without pushing it against the boot’s interior.
If your boots are already slightly large, a thicker insole (like some models from the Sole brand) can be an excellent way to take up extra volume and improve fit. However, for a perfectly sized boot, you must match the insole thickness carefully. Achieving the right fit is not a guessing game; it’s a critical step in building your thermal footwear system.
Your Action Plan: Achieving the Perfect Thermal Insole Fit
- Test in Person: Take your boots to an outdoor retailer. Physically try different insole models inside your boots to find one that matches the original’s volume and feel.
- Match Stock Volume: The golden rule is to choose a thermal insole that takes up a similar amount of space as the stock insole to prevent compression and pressure points.
- Assess Arch Support: Match the insole’s arch to your foot type. Standard support works for normal/low arches, while high arches often require specialized models like Sole or Superfeet for proper biomechanical function.
- Mind the Boot Size: For boots that are slightly oversized, a thicker, higher-volume insole can be used to perfect the fit and add insulation simultaneously.
- Test the Complete System: Walk around the store with the new insoles in your boots, wearing the socks you’d use in the field. The right combination means all-day comfort; the wrong one means sore, cold feet by lunchtime.
Why Aluminum-Faced Insoles Can Cause Sweaty Feet and How to Fix It?
Insoles with a reflective aluminum layer are based on a sound principle of physics: radiant heat reflection. Much like a survival blanket, the foil layer is designed to reflect your body’s own infrared radiation back toward your foot. This can be effective, especially in very cold, dry, and static conditions. However, this design has a critical, often overlooked flaw: aluminum is a perfect vapor barrier. It does not breathe. At all.
Your feet can produce a surprising amount of sweat, even in the cold, especially during active hiking. With a standard breathable insole (like wool or foam), this moisture vapor is wicked away from the skin and dispersed. With an aluminum-faced insole, that vapor hits the non-permeable foil layer and is trapped. The moisture condenses, leaving your sock and the bottom of your foot damp. Since water conducts heat away from the body about 25 times faster than air, this trapped moisture becomes a thermal superhighway, rapidly chilling your feet. This phenomenon, known as vapor barrier failure, is why many users report feet that are initially warm but become progressively colder and clammier throughout the day.
As one experienced outdoorsman noted when discussing DIY foil solutions, it sounds like a recipe for disaster. This sentiment was shared by a Rokslide forum member in a winter thermal insole discussion:
Old bushcraft lore indicates you can use heavy duty foil under your insole to accomplish the same as the Oboz. Sounds like a blister nightmare when side hilling from the amount of slipping and sliding your insole would have on top of the aluminum.
– Rokslide Forum Member, Winter Thermal Insole Discussion
The solution to using a radiant barrier without creating a swamp is a sophisticated sock system. You must pair the insole with a thin, synthetic liner sock that aggressively wicks moisture off the skin, topped by a thicker wool or synthetic insulating sock. This system attempts to manage moisture before it gets trapped against the foil. However, for all-day wear with varying activity levels, a breathable insole is often a safer and more comfortable choice.
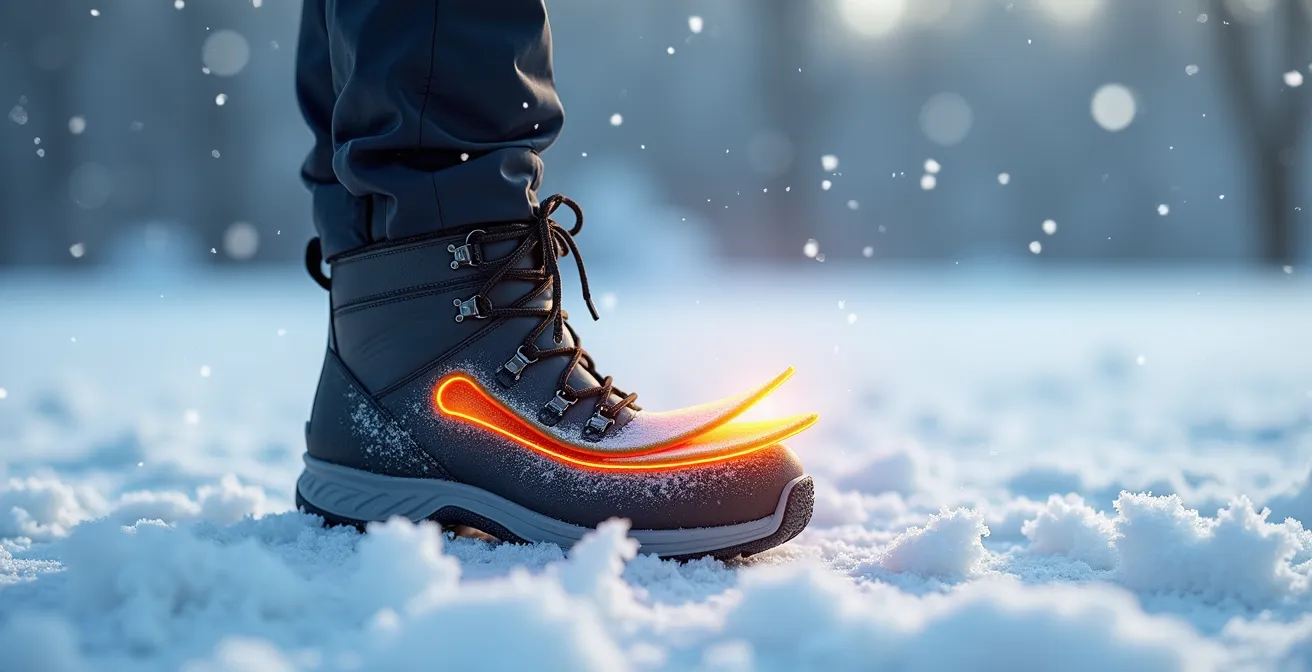
The Ground-Conduction Error That Freezes Feet Even in Good Boots
Many hikers and hunters invest in boots with heavy-duty insulation (400g, 600g, or more) yet still suffer from frozen toes. They make the critical error of underestimating the single greatest enemy of warm feet: conductive heat transfer. From a physics standpoint, your body loses heat in three ways: convection (to the air), radiation (into space), and conduction (through direct contact). When you are standing or walking on snow or frozen ground, your feet are in direct contact with a massive, heat-sucking object.
From a heat transfer engineering perspective, conductive heat transfer through the sole to snow is more efficient than heat loss to the cold air around the rest of the boot. The sole of your boot becomes a “thermal bridge,” a direct pathway for your body’s warmth to be drawn out. The flimsy foam insole that comes standard in most boots offers almost no resistance to this process. You could have an inch of insulation around your ankle, but if the sole of your foot is separated from the ice by only a thin layer of rubber and compressed foam, you will lose the battle for warmth.

This is precisely why a high-quality thermal insole is not just an accessory but a cornerstone of any effective winter footwear system. It is your primary shield against conductive heat loss. Its job is to create a thick, stable barrier of trapped air directly between your foot and the cold-soaked outsole of the boot. By installing a proper thermal insole, you are severing that thermal bridge and giving the insulation in the rest of your boot a fighting chance to do its job. Without addressing the ground-conduction problem at its source, any other effort to keep your feet warm is severely compromised.
When to Switch to Thermal Insoles for the Winter Season?
Proactive thermal management is more effective than reactive damage control. Instead of waiting for that first miserably cold day to realize your footwear is inadequate, it’s best to transition your system as the seasons change. For many hunters and hikers in northern climates, this transition happens around November. As temperatures consistently drop towards freezing, the standard, uninsulated insoles in your three-season boots become a liability.
The decision of when to switch and what to switch to depends on both temperature and activity level. For mild winter conditions, roughly 20°F to 40°F (-6°C to 4°C), you may not need a fully insulated boot. Often, simply adding a quality thermal insole to your favorite three-season hiking boots is enough to provide the necessary warmth, especially if you are active and generating body heat. This approach maintains the comfort and broken-in feel of your trusted boots while adding crucial ground insulation.
As conditions become more severe, the requirements escalate. For temperatures consistently below 20°F (-6°C) or for more static activities like ice fishing or stand hunting, a dedicated insulated boot becomes necessary. The following table provides a general guideline for matching insulation levels to the environment.
| Temperature Range | Activity Level | Insulation Needed |
|---|---|---|
| 32°F to 50°F (0°C to 10°C) | Active | 100g insulated boots |
| 0°F to 32°F (-18°C to 0°C) | Moderate | 200g range insulation |
| Below 0°F (Below -18°C) | Static | 400g insulation or higher |
Even with heavily insulated boots, a thermal insole is still a vital upgrade to combat ground conduction. For extreme cold, many experienced users will also add disposable toe warmers to their system. However, these should be seen as a supplement for extra protection, not a crutch for an inadequately insulated system.
How to Match Insole Arch Height to Your Foot Profile Correctly?
While thermal properties are the main focus, the biomechanical function of an insole cannot be ignored. The right arch support is crucial for comfort, stability, and even warmth. Your foot’s arch is a natural shock absorber. When you’re hiking, especially with the weight of a pack, this arch flexes under load. An insole that fails to properly support your arch allows it to collapse or over-pronate. This not only leads to foot fatigue and conditions like plantar fasciitis but also affects the thermal system within your boot.
When the arch collapses, your foot lengthens and flattens, pressing against the front and sides of the boot. This creates unintended compression of your socks and the boot’s insulation, reducing their effectiveness. It also creates friction and pressure points, which can lead to blisters and poor circulation. A well-supported foot maintains its proper shape and volume, ensuring the space needed for insulation to work and for blood to circulate freely. This stability is the foundation of all-day comfort.
Matching the insole to your foot profile is essential. Most standard or “neutral” thermal insoles provide good support for people with normal to low arches. However, if you have a high arch, these may not be sufficient. You’ll need an insole with a more pronounced, rigid structure to prevent the arch from collapsing. Brands like Sole and Superfeet are well-regarded for offering models specifically designed for high arches. As one user noted after trying various models, they are the go-to choice for those needing more aggressive support. Getting this right is not just about comfort; it’s about ensuring your entire footwear system can function as designed.
Why Most Modern Boots Fail at the Flex Point Within 12 Months?
A thermal insole is only as good as the boot that contains it. The entire footwear system can be compromised if the boot itself fails prematurely. One of the most common failure points on modern hiking and hunting boots is the primary flex point—the area across the top of the foot where the boot creases with every step. This area is subjected to thousands of cycles of compression, stretching, and abrasion, often in wet, cold, and gritty conditions.
Many modern boots, in an effort to reduce weight and break-in time, use a complex patchwork of leather, synthetic fabrics, and multiple stitched seams in this high-stress zone. While comfortable out of the box, these stitched seams become weak points. Water penetrates the needle holes, flexing fatigues the thread, and the constant movement can cause delamination of waterproof membranes. Cold temperatures exacerbate the problem by making materials more brittle. Once this area is compromised, the boot’s structural integrity and waterproofing are lost, rendering the entire thermal system useless.
Anecdotal data from demanding environments, such as that from Alaskan oil workers, has shown that boots with simpler, more robust construction, like those with welded seams, can last significantly longer than their stitched counterparts in wet-cold conditions. To ensure the longevity of your footwear system, it pays to scrutinize boot construction with a focus on durability at the flex point. Key features to look for include:
- Thick, high-quality leather uppers (e.g., 8oz) with minimal seams.
- Articulated ankle designs that are engineered to bend without stressing a single crease.
- Welded seams or seamless construction in the flex zone instead of traditional stitching.
- A taller shaft (mid-calf), which helps distribute stress and offers better overall protection.
Key Takeaways
- Treat your footwear as a complete thermal system (boot, insole, sock), not as isolated parts.
- The primary battle for warmth is against conductive heat loss to the ground; a quality thermal insole is your main shield.
- Moisture is the enemy of warmth. Prioritize breathability and active vapor management over purely radiant barriers.
Finalizing Your Footwear System: Why Details Like Laces Matter
Once you have addressed the major components of your winter footwear—a durable, well-fitting boot, a high-performance thermal insole, and a proper sock system—it is the fine details that elevate it from good to truly reliable. A component as seemingly trivial as your boot laces can become a critical point of failure. Standard cotton or nylon laces readily absorb moisture from snow and slush. As temperatures drop, this moisture freezes, turning the laces into rigid, icy strands. This seemingly minor issue has major consequences.
First, frozen laces are incredibly difficult to tie or untie with cold, gloved hands. Adjusting the fit of your boot on the trail becomes a frustrating, if not impossible, task. A frozen knot can be a nightmare to deal with at the end of a long, cold day. Second, and more importantly from a thermal perspective, a wet lace is a sign of moisture intrusion. As we know, wet insulation loses over 90% of its thermal efficiency. A soaked lace acts as a wick, drawing moisture and cold into the tongue and eyelets of the boot, compromising the entire thermal envelope you’ve worked so hard to build.
The solution is to use moisture-wicking or hydrophobic laces. These are typically treated with a Durable Water Repellent (DWR) finish that causes water to bead up and roll off rather than soak in. They stay flexible in freezing temperatures and prevent the transfer of moisture into your boots. You can purchase these specialty laces or treat your existing ones yourself. Taking a few minutes to waterproof your laces is an expert-level detail that pays huge dividends in comfort and reliability. It’s the final polish on a well-engineered system, ensuring every component is working to keep you warm and dry.
Stop guessing with your gear and start engineering your warmth. Re-evaluate your current winter footwear using these principles to build a system that keeps you comfortable, safe, and focused on your adventure—not on your feet.