Anglers often struggle to locate trout in fast water because they rely on surface-level adages instead of understanding the underlying physics. The key to consistently finding fish and ensuring your safety is not just seeing the river, but interpreting it as a system of energy. This guide decodes the principles of river hydrodynamics, revealing how to identify low-energy zones trout must use to survive and how to calculate the physical forces that pose a risk to you as a wader.
Standing before a rushing river can feel overwhelming. To the untrained eye, it’s a chaotic surge of power, a uniform blur of turbulent water. Many anglers default to common but incomplete advice: “cast behind that rock” or “look for the bubble line.” While not entirely wrong, this approach is like trying to read a book by only looking at the pictures. It misses the narrative—the fundamental story of energy, pressure, and flow that dictates a trout’s entire existence. True mastery in reading water isn’t an art; it’s the practical application of river hydrology.
Trout are slaves to energy conservation. Every moment they spend fighting the main current is a net loss of calories. Therefore, their survival depends on finding positions that offer shelter from the fastest flow while still providing access to the “conveyor belt” of food drifting by. These prime lies are not random; they are predictable points created by the river’s interaction with structure, dictated by the unchangeable laws of physics. Understanding these principles is the most significant leap an angler can make, transforming a confusing landscape into a clear map of opportunities.
This guide moves beyond simple tips to explain the *why* behind a trout’s location. We will dissect the hydrodynamic forces that create eddies, seams, and other holding water. By thinking like a hydrologist, you will learn to see the invisible structure of the current, predict where fish will be before you even make a cast, and, just as importantly, recognize and navigate the very real dangers that fast water presents. This knowledge elevates your angling from a game of chance to a calculated strategy.
To help you master these concepts, this article breaks down the essential elements of reading water. We will explore everything from the micro-habitats behind boulders to the safest way to cross a powerful current, providing a complete framework for both success and safety on the river.
Summary: A Hydrologist’s Guide to Reading River Currents for Trout
- Why Eddies Behind Boulders Are Prime Energy-Saving Spots for Trout?
- The Wading Belt Mistake That Can Drown You if Your Waders Fill Up
- Upstream vs Downstream Casting: Which Presentation Looks More Natural?
- How to Fish a River Immediately After Heavy Rain Without Failure?
- How to Identify the ‘Seam’ Where Fast and Slow Water Meet?
- How to Identify Safe Crossing Points in Turbulent Water?
- Why a Tight Loop Is Critical for Accuracy and How to Form It?
- Brown Trout vs Rainbow Trout: How Feeding Habits Differ in Alpine Streams?
Why Eddies Behind Boulders Are Prime Energy-Saving Spots for Trout?
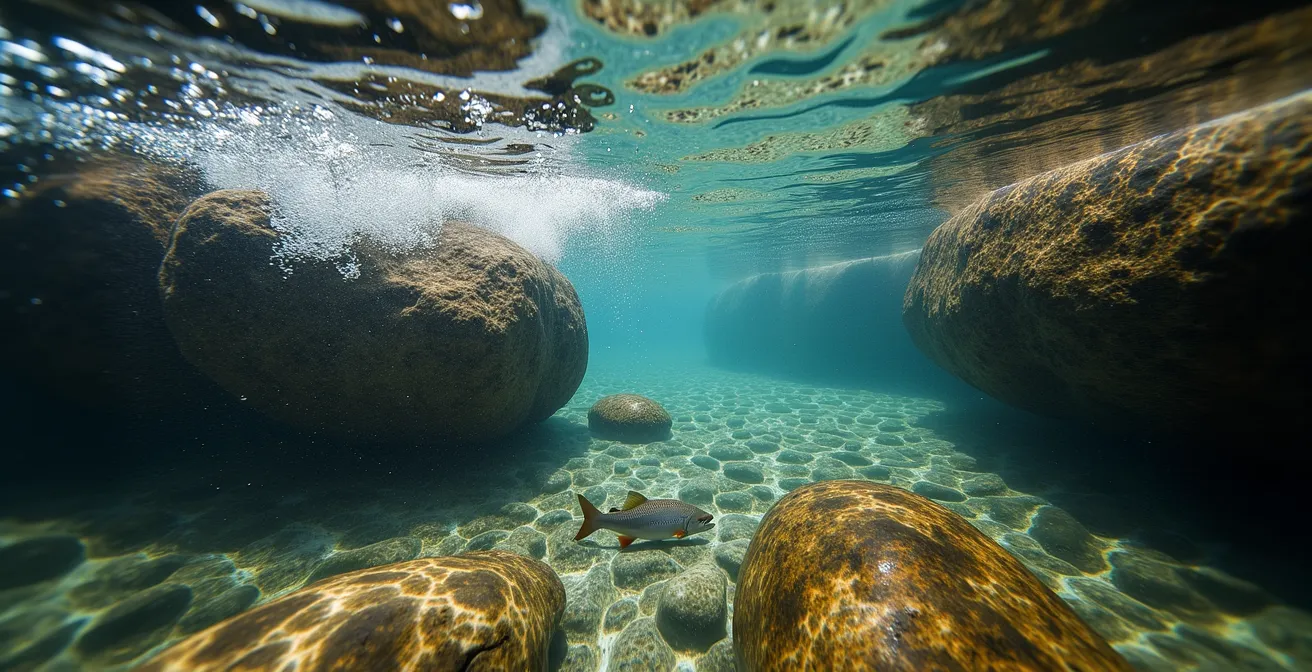
An eddy behind a boulder is the classic example of a trout lie, but understanding the fluid dynamics involved is what separates a novice from an expert. As fast water collides with the upstream face of a boulder, it must accelerate around the sides. This creates a low-pressure zone, or “hydraulic shadow,” directly behind the obstruction. The river essentially creates a vacuum that the surrounding water rushes back to fill, resulting in a gentle, often reverse-flowing current. This is the eddy—a pocket of calm in the midst of chaos. For a trout, holding in this zone is the equivalent of a person stepping out of a gale-force wind into the quiet lee of a building.
The fish’s goal is to expend the absolute minimum energy. It positions itself in this slow-moving refuge, waiting for the adjacent fast current to deliver food. The edge of the eddy, where it meets the main flow, is the dinner table. A trout can dart out into the fast current to grab a passing insect and immediately return to its low-energy holding position. This behavior is most pronounced when water temperatures are optimal for feeding; research shows trout display highest feeding activity between 55°F to 65°F (13°C to 18°C).
Studies on hydrodynamic behavior confirm this energy-saving strategy. Research into brown trout has shown that fish actively seek out these low-drag zones to minimize energy expenditure. An interesting finding from hydrodynamic space use studies is that the stability of an eddy is related to the fish’s size; eddies with a diameter roughly equivalent to a fish’s body length can become unstable and difficult for it to hold in. This is why larger, more angular boulders often create more stable and desirable lies for bigger trout—they generate larger, more defined hydraulic shadows.
The profitability of an eddy is therefore a function of its size, the velocity of the adjacent current, and its depth. A prime eddy offers a perfect balance: enough slow water to provide a comfortable resting spot and immediate access to a fast-moving “food lane.” When you see a boulder, don’t just see a rock; see the low-pressure system it creates and the strategic advantage it offers a trout.
The Wading Belt Mistake That Can Drown You if Your Waders Fill Up
While understanding river hydrodynamics is crucial for finding fish, it is even more critical for personal safety. The single most dangerous misconception among anglers is that a wading belt’s primary purpose is comfort or to keep waders up. In reality, its function is lifesaving: it prevents your waders from instantly filling with hundreds of pounds of water if you fall. Without a snugly cinched belt, a fall in even waist-deep current can be catastrophic. The force of the river will billow your waders open, trapping an immense volume of water and turning you into an anchor.
This is not an exaggeration. A standard pair of waders can trap over 10 gallons of water, adding more than 80 pounds of dead weight. This weight, combined with the relentless force of the current, makes self-rescue nearly impossible. The mistake is twofold: not wearing a belt at all, or wearing a thin, flimsy one that is too loose to create an effective seal. A proper wading belt should be at least two inches wide, relatively rigid, and tightened to the point where it is snug but not restrictive. It creates a gasket-like seal against your body that dramatically slows the ingress of water, giving you precious seconds to regain your footing or initiate a self-rescue maneuver.
Think of the river’s force in terms of vectors. The current exerts a constant downstream force on your body. When your waders fill, you not only gain immense weight but also a massive increase in your drag profile, multiplying the force the river can exert on you. It’s a simple physics problem with a deadly outcome.
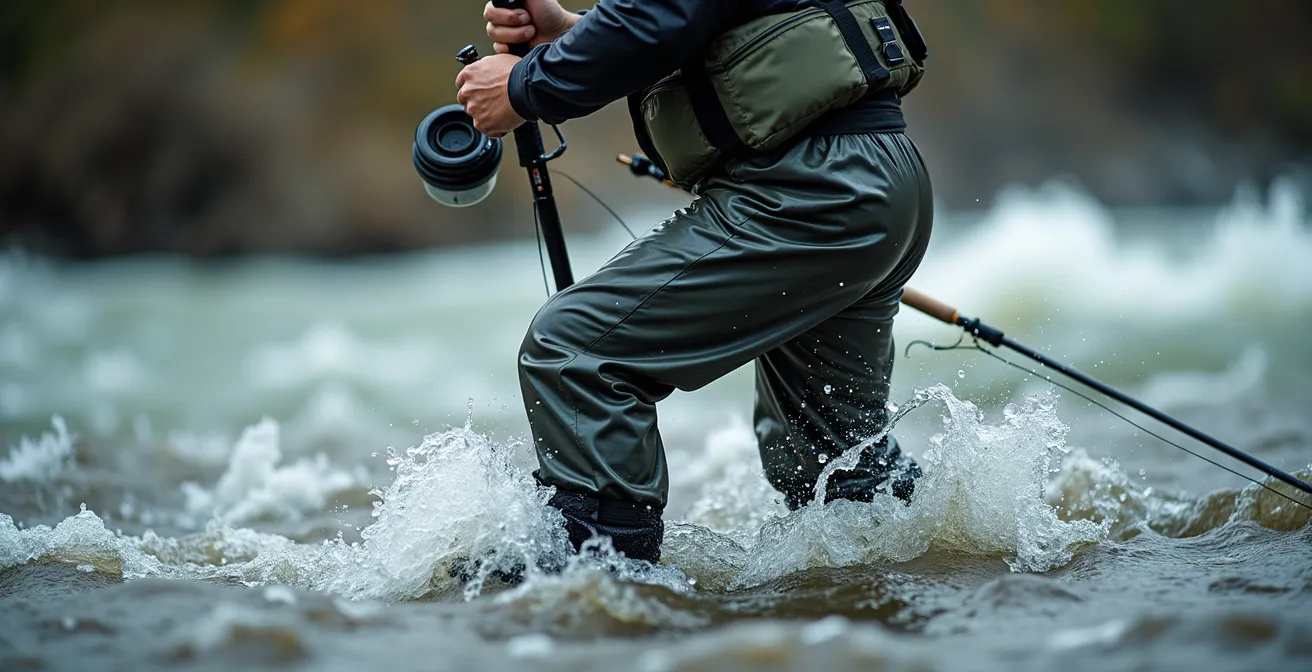
As shown in the image, safe wading involves more than just a belt. It requires a stable, athletic stance and often the use of a wading staff as a third point of contact. However, the belt is your last line of defense against a worst-case scenario. Treating it as an optional accessory is a gamble that no fish is worth. It is the most important piece of safety equipment you own, and failing to use it correctly is the most common and fatal wading error.
Upstream vs Downstream Casting: Which Presentation Looks More Natural?
Once you are positioned safely in the river, the next challenge is presenting your fly in a way that mimics natural food. The choice between casting upstream or downstream is not a matter of preference but a strategic decision dictated by the current, the type of fly, and the trout’s position. The universal goal is to achieve a “dead drift”—having the fly travel at the exact same speed as the current, just as a natural, dislodged insect would. Any deviation from this, known as “drag,” is an instant red flag to a wary trout.
Casting upstream is the classic method for dry flies and nymphs. By casting up and across the current, the fly, leader, and fly line land upstream of the fish. This allows the fly to drift down naturally into the trout’s field of vision before the fish ever sees the leader or line—a critical advantage in clear, calm water. The challenge of upstream casting is managing your slack. You must strip in line at the same speed the current is bringing it toward you to maintain contact with the fly and be ready for a strike.
Downstream casting, conversely, is often superior for presenting streamers that imitate baitfish. A cast down and across the current allows the fly to swing through the water column under tension. This presentation doesn’t mimic a dead insect but rather a fleeing or injured minnow, triggering a predatory response. The “downstream swing” is particularly effective in broad, uniform currents where you need to cover a lot of water. The tension from the line imparts a natural-looking swimming action to the fly that is difficult to replicate with any other method.
The concept of the river being divided into “lanes” of current is essential here. As expert Tom Rosenbauer notes, “A trout likes to live in slow to moderate current with faster water close by.” A study of trout behavior found they rarely move across these lanes to feed, especially in faster water. Your presentation must therefore deliver the fly precisely within the trout’s feeding lane. The following table provides a strategic guide for different scenarios:
| Current Type | Best Casting Direction | Fly Type | Reason |
|---|---|---|---|
| Pocket water seam | Upstream dead drift | Nymph | Natural tumbling presentation |
| Broad uniform current | Downstream swing | Streamer | Mimics fleeing baitfish |
| Tight trough | High-stick across | Heavy nymph | Maintains contact in fast water |
| Clear slow water | Upstream approach | Dry fly | Fly arrives before leader/line |
Ultimately, a “natural” presentation is one that is appropriate for the fly you are fishing and the water you are fishing it in. There is no single correct answer; the expert angler analyzes the specific hydrodynamic situation and chooses the casting direction that offers the most convincing imitation. It is a decision rooted in observing the water’s speed and structure.
How to Fish a River Immediately After Heavy Rain Without Failure?
A heavy rainstorm transforms a river’s entire ecosystem, and for many anglers, it signals a day to stay home. The water becomes high, muddy, and seemingly unfishable. However, for the angler who understands how this event alters the river’s hydrodynamics and a trout’s behavior, it can create a window of outstanding opportunity. Success hinges on adapting your strategy away from the clear-water norms and targeting the new advantages the stained water provides.
The first change is location. As the main channel becomes a torrent of high-velocity, turbid water, trout are forced to abandon their usual holding spots. They seek refuge from the punishing current, and their new prime lies are found along the newly flooded margins of the bank. Areas of grass, bushes, or rocks that were dry just hours before are now submerged in slow-moving water, offering perfect shelter. These soft edges become the most productive places to fish, as trout will stack up in them to conserve energy.
The second adaptation is fly selection. In muddy water, a trout’s vision is severely limited. They rely more on their lateral line to detect pressure waves and movement. Therefore, delicate, imitative patterns become useless. You must switch to large, dark, water-pushing flies. Bulky streamers, big stonefly nymphs with rubber legs, or any pattern with a large silhouette creates a more visible profile and, more importantly, generates vibrations that trout can feel. Color is less important than contrast; black, dark olive, and purple stand out best against a murky background.
Finally, timing is critical. The “golden window” often occurs not during the peak of the flood, but as the water begins to drop and clear. When visibility improves from zero to about one foot, trout go on an aggressive feeding spree. The flood has dislodged a massive amount of food—worms, nymphs, and other invertebrates—and the fish take advantage of the cover of the stained water to feed with less caution. Be mindful of water temperature, however. A warm summer rain can quickly raise river temperatures; studies indicate trout become stressed when temperatures exceed 70°F (21°C), which can shut down feeding activity despite other favorable conditions.
How to Identify the ‘Seam’ Where Fast and Slow Water Meet?
If an eddy is a resting spot, a seam is the dining room. A seam is the distinct, often visible boundary where two currents of different speeds converge. From a hydrodynamic perspective, this is a shear line where a fast main current flows alongside a slower current, like an eddy, a slow bank-side margin, or the flow behind a large underwater feature. For a trout, this is the perfect lie. It can hold in the slower current, expending minimal energy, while watching the adjacent fast current—the “conveyor belt”—deliver a steady supply of food.
The most obvious visual cue for a seam is a line of foam or bubbles on the surface. This is so reliable that it has spawned one of fly fishing’s oldest adages. As fly fishing writer Mark Pickrel states, “A telltale sign of a seam is a foam line on the water’s surface. When two currents meet, the water becomes agitated and these lines of bubbles are formed. There’s an old adage about trout habitat, ‘foam is home’, and it’s pretty darn reliable.” The physics behind this is simple: the turbulence at the shear point between the two currents traps air, creating the bubbles that then collect along this line.

Beyond foam, a seam can be identified by observing other surface texture differences. The faster current will often have a choppier, more “nervous” surface, while the slower water will appear smoother and glassier, as seen in the image above. You may also see a collection of small debris—twigs, leaves, and spent insects—drifting perfectly along this line, further confirming its identity as a food-delivery system. Another powerful indicator is a change in water color, especially at the confluence of two different streams, where a clearer tributary meets a murkier main river. The seam will be a distinct line between the two colors.
Not all seams are created equal. Their characteristics and how you fish them can vary greatly depending on what structure creates them. Understanding these different types allows for a more precise and effective presentation.
| Seam Type | Length | Best for | Visual Cues |
|---|---|---|---|
| Boulder Seams | Short (3-10 ft) | Pocket fishing | Turbulent, well-defined |
| Confluence Seams | Long (50+ ft) | Extended drifts | Color change, debris line |
| Bank Seams | Variable | Dry fly fishing | Calm edge along current |
| Ledge Seams | Medium | Deep nymphing | Boiling upwellings |
Fishing a seam effectively requires casting into the faster current and letting your fly drift naturally down the line, right on the border of the slow water. A perfect drift along a seam is the single most productive presentation in river fishing, as you are placing your fly directly in a trout’s prime feeding lane.
How to Identify Safe Crossing Points in Turbulent Water?
The ability to safely cross a river is as important as the ability to fish it. Misjudging the power of the current can lead to a dangerous or even fatal situation. Identifying safe crossing points is a skill based on reading the river’s hydrodynamics and understanding that what you see on the surface reveals the topography and danger below. The goal is to find a path where the combined force of water depth and velocity is at its minimum.
The safest places to cross are almost always in “tail-outs” and wide, shallow riffles. A tail-out is the section at the very end of a pool where the riverbed grades upward and the water becomes shallower and wider before spilling into the next riffle. Here, the river’s energy is dissipated over a broader area, resulting in reduced depth and velocity. Look for a wide, flat expanse of water with a smooth, even surface. A smooth surface generally indicates a uniform gravel or sand bottom, which is stable and predictable to walk on. Conversely, a choppy, boiling surface signals hidden boulders and an uneven bottom that can easily trip you up.
Avoid crossing at the head of a pool or in a narrow channel, where the water will be deepest and fastest. A critical hydrodynamic principle to remember is that on any river bend, the fastest, deepest water—the “thalweg”—is always on the outside of the curve. The inside of the bend will have slower, shallower water due to sediment deposition, making it a much safer path. Always look downstream from your intended crossing point to ensure there are no dangerous rapids, logjams, or deep pools you could be swept into if you fall.
Before committing to a crossing, it’s wise to perform a quick risk assessment. Find a spot where the water is no deeper than your upper thigh; any deeper, and the force of the current against your body increases exponentially, making you unstable. Test the current’s speed by tossing a leaf in and seeing how fast it moves. If it moves faster than a walking pace, the force is significant. The combination of depth and velocity is the true measure of risk. A shallow, fast current can be just as dangerous as a deep, slow one.
Wading Risk Assessment Checklist
- Assess surface patterns: Check if the surface is smooth (indicating a uniform bottom) or choppy and boiling (signaling hidden boulders and uneven terrain).
- Apply downstream ferry angle: Always face upstream into the current, but angle your movement diagonally downstream to use the current for stability assistance rather than fighting it directly.
- Target the tail-out zones: Identify the wide, shallow sections at the end of pools where the river’s energy is naturally dissipated and the bottom is often smoother.
- Calculate risk factors: Mentally combine the current’s speed (tested with a floating leaf) with water depth. If the depth is above your knee and the speed is faster than a walking pace, reconsider the crossing.
Why a Tight Loop Is Critical for Accuracy and How to Form It?
While reading water tells you where to fish, your cast is what gets you there. In the world of fly casting, the “tight loop” is the gold standard of efficiency and accuracy. A loop is the shape the fly line makes as it travels through the air. A tight loop is one where the top and bottom legs of the fly line are close together and nearly parallel. From a physics perspective, it is a highly efficient transfer of energy. A wide, open loop, by contrast, is an inefficient one that bleeds energy into the air, resulting in poor accuracy and a collapsed, messy presentation.
A tight loop is critical for three main reasons. First, it maximizes accuracy. As casting expert Simon Gawesworth explains, “A tight loop is a focused wave of energy, ensuring your fly lands where you intend with the leader straight, while a wide loop dissipates energy and results in a pile of slack line on the water.” This focused energy is less affected by wind and travels in a straighter path to the target. Second, it ensures a good presentation. A tight loop unrolls completely and lands the fly with the leader straightened out, which is essential for achieving an immediate dead drift. A wide loop often collapses, dumping the leader in a pile on the water, which guarantees drag. Third, it allows you to cast farther with less effort by conserving the energy you put into the rod.
Forming a tight loop is not about power; it’s about precise mechanics. The key is controlling the path of the rod tip. To generate a tight loop, the rod tip must travel in a perfectly straight line during the casting stroke. Any significant arc or curve in the rod tip’s path will create a wider loop. This is achieved by minimizing wrist movement and using the forearm as the primary lever. Imagine you are painting a straight line on a ceiling with the tip of your fly rod.
The other crucial component is a smooth acceleration to an abrupt stop. The casting stroke should build speed progressively, then stop sharply. It is this sudden stop that transfers the energy from the rod to the line and forms the loop. A soft, slow stop will fail to load the rod properly and result in a weak, wide loop. Mastering this combination of a straight rod-tip path and a crisp stop is the secret to throwing tight, accurate loops that enable you to place your fly precisely where the river’s currents have told you a trout should be.
Key Takeaways
- Trout location is dictated by energy conservation; they must hold in slow water adjacent to fast-moving “food conveyor belts.”
- Seams and eddies are not random; they are predictable hydraulic features created by obstructions that offer trout shelter and feeding opportunities.
- Wading safety is a matter of physics. A snug wading belt is a non-negotiable safety device that prevents waders from filling with water and turning you into an anchor.
Brown Trout vs Rainbow Trout: How Feeding Habits Differ in Alpine Streams?
Once you have learned to identify prime holding water, the final layer of strategy is understanding which species of trout is most likely to occupy it. While both brown and rainbow trout often share the same rivers, their behavior and feeding habits, particularly in the fast currents of alpine streams, are distinctly different. Recognizing these tendencies allows you to refine your approach and target your desired species with greater precision.
Rainbow trout are generally considered the more aggressive and opportunistic of the two. They are often found in the primary feeding lanes of a river—the main current or the fastest part of a seam. They are more willing to expend energy and will often move a considerable distance to chase down a fly. Their tolerance for faster water makes them the likely resident of the classic riffle and run habitat. If you see a long, defined seam with a good, steady flow, a rainbow trout is a strong possibility.
Brown trout, on the other hand, are more reclusive and structure-oriented. They are masters of energy conservation and are almost always found in proximity to heavy cover. They prefer the darker, more protected lies: deep under an undercut bank, in the dark pocket water beneath an overhanging branch, or tight against the face of a large boulder. A brown trout is far less likely to move a great distance for a meal; the presentation must be nearly perfect, drifting the fly directly on their nose. They are also more crepuscular, with peak feeding activity often occurring during the low-light hours of dawn and dusk, whereas rainbows will feed opportunistically throughout the day if a hatch is present.
These behavioral differences are key to your strategy. The following table highlights the contrasting characteristics you can expect in a typical alpine stream environment.
| Characteristic | Brown Trout | Rainbow Trout |
|---|---|---|
| Preferred Water Type | Structure-oriented (eddies, undercuts) | Fast water primary feeding lanes |
| Feeding Window | Crepuscular (dawn/dusk) | Opportunistic all day if hatch present |
| Ideal Temperature | 55-65°F | 55-60°F |
| Strike Response | Requires perfect drift on nose | Will move distance to chase |
| Typical Location | Dark pocket under sweeper | Long defined seam |
When you approach a new piece of water, analyze its structure through this lens. Is it a long, open seam with a consistent flow? Think rainbow. Is it a complex jumble of boulders and dark pockets with plenty of overhead cover? Think brown. This final layer of analysis, combining river hydrology with fish biology, is the hallmark of a truly advanced angler.
The next step is to move from theory to practice. On your next outing, take the time to observe these hydrodynamic principles before you even make a cast. Watch how the water interacts with structure, identify the seams, and consciously choose your crossing points. This deliberate observation is the true path to mastering the river.