Success in coastal fishing isn’t about the tide itself, but about mastering the entire hydrodynamic system it controls.
- Tidal velocity (spring vs. neap) dictates feeding strategies and bait presentation far more than simple tide height.
- Environmental factors like salinity, water color, and wave patterns are direct, readable clues to species location and safety.
- Optimizing your gear—from line choice to drag settings—is a physical response to the powerful forces the tide creates.
Recommendation: Stop just “fishing the tide” and start tracking the complete system to predict fish behavior before you even cast.
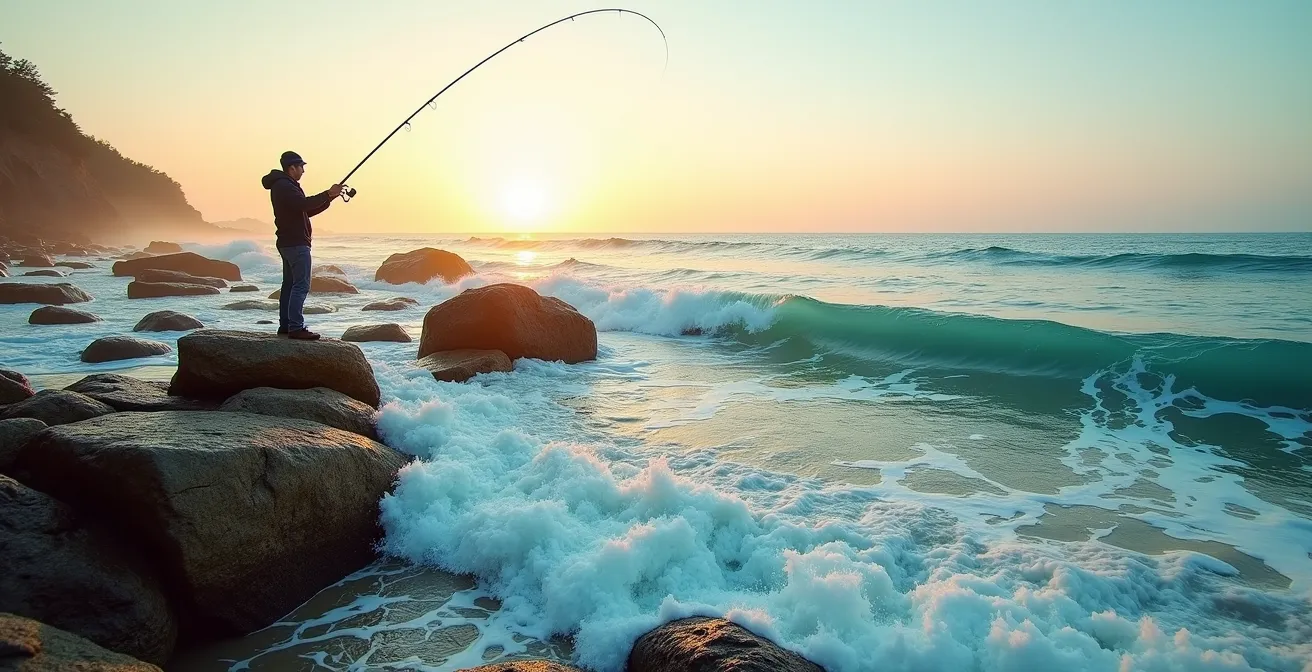
Every saltwater angler knows the frustration: you arrive at a promising spot, the sun is perfect, but the water is a dead, lifeless mirror. Hours later, the same spot erupts with activity. The common wisdom says to “fish the moving tide,” a rule that is true but hopelessly incomplete. Many anglers focus on high or low tide times, believing one is magically better than the other. They might hear about solunar tables or the importance of structure, but these are often treated as separate, disconnected pieces of advice.
But what if the key isn’t just knowing the tide is moving, but understanding *how* it moves? What if the secret lies in viewing the entire coastal environment as a single, predictable hydrodynamic system? The tide is the engine, but it powers a complex machine of currents, salinity changes, wave dynamics, and bait movement. Mastering this system means shifting from a mindset of luck to one of strategy. It means reading the water not as a fisherman, but as a tide tracker who can anticipate the cause and effect of every ripple and color change.
This guide deconstructs that system. We won’t just tell you *what* to do; we will explain *why* it works. We’ll explore how the tide’s power dictates everything from the microscopic salt crystals that destroy your gear to the precise currents that create feeding frenzies. By understanding each component, you can learn to predict where fish will be and how they will behave, turning a tide chart into a treasure map.
This article breaks down the essential components of the tidal system, providing a clear roadmap to understanding the forces at play. Explore the detailed sections below to build your expertise from the ground up, connecting each piece of the puzzle.
Summary: Mastering the Hydrodynamic System for Coastal Angling
- How to Remove Salt Crystals from Reels Before They Seize Up?
- Neap Tide vs Spring Tide: Which Offers Better Currents for Feeding?
- How to Read the Waves to Place Bait in the Trough?
- Snook or Redfish: Which Species Tolerates Low Salinity After Rain?
- The Water Color Change That Warns of Dangerous Rip Currents
- How to Predict Feeding Windows Based on Solunar Tables?
- Why Braided Line Casts Farther Than Monofilament of the Same Strength?
- How to Adjust Spinning Reel Drag to Stop Line Breakage on Large Fish?
How to Remove Salt Crystals from Reels Before They Seize Up?
Before you can master the tide, you must first defend your gear against its most insidious weapon: salt. Saltwater is not just water with salt in it; it’s an electrolyte solution that actively seeks to destroy your equipment through corrosion. When water evaporates, it leaves behind microscopic salt crystals that act like sandpaper on bearings and gears. Worse, when different metals (like an aluminum frame and a stainless steel handle) are connected in this solution, a process called galvanic corrosion begins. It’s an electrochemical reaction that dissolves the weaker metal, and according to coastal fishing equipment analysis, 95% of reel failures occur from this process within two years if maintenance is ignored.

The image above reveals the enemy in stark detail. Those seemingly beautiful crystalline structures are slowly eating away at the precise surfaces that allow your reel to function smoothly. Understanding this destructive power is the first step. The second is implementing a rigorous, multi-tiered maintenance protocol. Simply rinsing your reel isn’t enough; you must actively combat salt intrusion at every level, from a quick field clean to a full annual service. A well-maintained reel is your primary connection to the fish, and protecting it is non-negotiable.
Action Plan: Saltwater Reel Maintenance Protocol
- Field Clean (After Each Trip): Rinse reel with low-pressure freshwater spray for 30 seconds, focusing on the handle, spool, and bail arm. Do not use high pressure, as this can drive salt deeper into the mechanism.
- Weekly Maintenance: Apply a thin coat of a quality corrosion inhibitor spray to all external metal parts, then wipe away the excess with a clean microfiber cloth.
- Monthly Deep Clean: Partially disassemble the spool and handle. Use cotton swabs and isopropyl alcohol to clean internal areas where salt tends to collect, known as salt traps.
- Quarterly Service: Perform a full disassembly of the reel. Clean and replace the old grease in the main gear box with a high-quality, marine-grade PTFE lubricant. Inspect all bearings for signs of pitting or roughness.
- Annual Overhaul: For heavily used reels, consider a professional service or a complete DIY rebuild. This involves replacing all critical wear components like seals, bearings, and drag washers to restore factory performance.
Neap Tide vs Spring Tide: Which Offers Better Currents for Feeding?
Most anglers check tide charts for height (high vs. low), but the real secret lies in tidal *velocity*. The difference between a spring tide and a neap tide is the speed and volume of water movement, which acts as the primary switch for feeding activity. Spring tides, occurring during full and new moons, create the fastest currents and biggest water level changes. This powerful flow acts like a conveyor belt, dislodging crabs and shrimp and forcing baitfish into predictable channels. This is when ambush predators thrive.
Conversely, neap tides, during the moon’s quarter phases, produce the weakest currents and minimal water level changes. The water is often clearer and calmer, creating ideal conditions for sight-fishing predators that hunt on the flats. The slower current allows them to cruise and search for prey without expending as much energy. Understanding which tide is active dictates not only where you fish, but how you fish.
Case Study: Species-Specific Current Velocity Preferences
A 2023 study tracking fish behavior across 367 miles of Texas coastline revealed definitive preferences. Flounder showed a 73% higher catch rate during neap tides with currents under 1 knot, as they prefer to lie in wait on the bottom. In contrast, striped bass activity peaked during powerful spring tides with 2-3 knot currents, which they use to disorient schools of baitfish. Redfish proved highly adaptable, but showed a clear preference for moderate 1.5-knot flows, often found during the transitional periods between the two major tide cycles.
This table, based on extensive analysis of tidal fishing conditions, breaks down the strategic differences between these two crucial phases of the lunar cycle. Choosing your target and technique based on this information is a fundamental shift toward predictive fishing.
| Characteristic | Spring Tide | Neap Tide | Best Target Species |
|---|---|---|---|
| Current Speed | Maximum velocity (3-5 knots) | Minimal velocity (0.5-2 knots) | Spring: Striped bass, tuna Neap: Flounder, permit |
| Water Clarity | Often turbid from stirred sediment | Generally clearer, less turbulence | Spring: Bottom feeders Neap: Sight-fishing targets |
| Bait Movement | Rapid, concentrated in channels | Slower, more dispersed | Spring: Ambush predators Neap: Cruising predators |
| Fishing Difficulty | Challenging boat control, heavy weights needed | Easier presentation, lighter tackle possible | Spring: Experienced anglers Neap: All skill levels |
| Optimal Techniques | Drift fishing, heavy jigs, live bait in current | Topwater, fly fishing, finesse presentations | Spring: Structure fishing Neap: Flats fishing |
How to Read the Waves to Place Bait in the Trough?
For the surf-based angler, the breaking waves are not random chaos; they are a direct and readable manifestation of the underwater topography and the tide’s influence. The most productive zone in the surf is the trough: a deeper channel that runs parallel to the shore, located between the beach and an outer sandbar. This trough acts as a natural highway for cruising fish, concentrating bait that gets washed over the bar. The key is placing your bait precisely within this zone.
The tide itself helps define this target. In fact, marine hydrodynamics research shows that incoming tides reduce wave periods by 40%, creating steeper, more organized waves with deeper, more defined troughs. To the trained eye, the location of the trough is revealed by the wave action. You’ll see waves build and crest over the outer bar, break, and then re-form or flatten out as they cross the deeper water of the trough. Your cast must land in that calmer, darker-looking water just behind the main break.
As legendary coastal guide Gordon Churchill notes in his analysis for Coastal Review, there are even more subtle clues on the surface. He advises anglers to look for the story told by the water’s surface:
The lines of foam and floating debris on the surface are convergence zones created by currents and often align directly over the deeper troughs where bait is being channeled.
– Gordon Churchill, Coastal Review – Understanding Tidal Fishing
This foam line is a literal map pointing to the fish’s dining lane. By learning to time your cast with the wave sets—typically a repeating pattern of two smaller waves followed by a larger one—you can land your bait in the trough just as the backwash from the breaking wave pulls bait off the bar, creating a perfect feeding opportunity.
Snook or Redfish: Which Species Tolerates Low Salinity After Rain?
A heavy rainstorm can completely reset an inshore fishing area, but not in the way most anglers think. The sudden influx of freshwater dramatically changes the salinity gradient of an estuary, creating zones that are intolerable for some species but perfectly comfortable for others. This creates a predictable migration pattern that a savvy tide tracker can exploit. The key difference lies in a biological process called osmoregulation—the ability of a fish to control the salt concentration in its body.
Snook and redfish, while often found in the same areas, have vastly different tolerances for low salinity. Snook are champions of osmoregulation, capable of surviving and even thriving in pure freshwater for extended periods. Redfish, on the other hand, are far less tolerant and will actively flee areas where salinity drops too low, seeking refuge in deeper channels or near inlets where the incoming tide brings in salty ocean water.
Case Study: Post-Hurricane Salinity Adaptation
Following the massive freshwater surge from Hurricane Ian in 2023, tracking studies in Charlotte Harbor, Florida, provided a dramatic example. Snook were found to have moved up to 15 miles upstream into residential canals where salinity had dropped to just 5 parts per thousand (ppt). Their catch rates in these brackish zones actually increased by 40%. Meanwhile, redfish completely evacuated their typical backcountry haunts, with all catches shifting to the Gulf passes where the incoming tide maintained a salinity of 25+ ppt. Zero redfish were caught in the upper estuary until salinity levels recovered above 20 ppt weeks later.
This stark difference in behavior is explained by their internal physiology. The following table, based on data on species-specific osmoregulation efficiency, highlights why snook are uniquely equipped to handle these environmental shifts.
| Physiological Factor | Snook | Redfish | Survival Implications |
|---|---|---|---|
| Minimum Salinity Tolerance | 0 ppt (pure freshwater) | 10 ppt (brackish minimum) | Snook access freshwater refuges |
| Kidney Filtration Rate | 3x baseline in freshwater | 1.5x baseline in freshwater | Snook maintain ion balance better |
| Gill Chloride Cell Density | Increases 200% in low salinity | Increases 50% in low salinity | Snook adapt faster to salinity changes |
| Energy Cost of Osmoregulation | 15% of metabolism | 25% of metabolism | Redfish experience stress sooner |
| Recovery Time to Normal Salinity | 2-3 hours | 8-12 hours | Snook handle rapid transitions better |
The Water Color Change That Warns of Dangerous Rip Currents
While currents are the lifeblood of coastal fishing, they also represent the system’s greatest danger. A rip current is a powerful, narrow channel of water moving directly away from the shore, and it is the leading hazard for beachgoers and wading anglers. These currents are not random; they are a direct result of the tidal system. They form when the tide and wave action push water up onto the beach, and that water seeks the path of least resistance—often a break in a sandbar—to flow back out to sea.
These currents become especially dangerous during an outgoing spring tide, when the massive volume of receding water is funneled through these narrow gaps. During these periods, rip current velocity can increase by 85%, reaching speeds of up to 8 feet per second—faster than an Olympic swimmer. Fishing the edges of these rips can be incredibly productive, as they act as a super-concentrated conveyor belt for bait. However, misjudging their power can be fatal. The key is visual identification from a safe distance.
A tide tracker doesn’t see a rip current as just turbulent water; they see a distinct feature with clear warning signs. The most obvious indicator is the color change. The water within the rip is often a different color—typically darker, sandy, or brown—because it is carrying sediment and debris from the surf zone out to sea. This creates a visible “river” flowing through the surrounding green or blue water.
To fish these productive zones safely, you must learn to recognize them from shore and position yourself correctly. Here are the key visual indicators:
- Look for a distinct, churning channel of water moving seaward, perpendicular to the breaking waves.
- Identify a line of foam, seaweed, or other debris moving steadily out to sea against the prevailing current.
- Notice a noticeable gap in the pattern of breaking waves. The area may appear deceptively calmer but will be darker in color.
- The most crucial sign is the color change from the normal green-blue of the surf to the brown-gray of the sediment-filled rip current.
- Always position yourself 20-30 feet to the side of the rip’s edge, never directly in its path. Cast parallel to the beach, allowing your bait to drift into the “seam” where the fast rip water meets the slower coastal water.
How to Predict Feeding Windows Based on Solunar Tables?
The tidal system is the primary driver of fish activity, but it’s influenced by another powerful, albeit more subtle, force: the gravitational pull of the sun and moon. This is the basis of solunar theory, which predicts peak feeding windows based on the moon’s position overhead and underfoot. Many anglers treat solunar tables as a standalone predictor, which often leads to disappointment. The true art is to layer solunar data *over* your tidal predictions to identify “perfect storm” scenarios.
Solunar tables identify four key periods each day: two major periods (when the moon is directly overhead or underfoot) and two minor periods (when the moon is on the horizon). These are times of increased gravitational pull that are believed to stimulate feeding behavior. However, a major solunar period occurring during a slack tide (no water movement) is often far less productive than a minor period that coincides with a strong, moving current.
Case Study: 30-Day Solunar Ground-Truthing Experiment
An angler’s detailed 30-day log from Galveston Bay offered critical insights. He found that major solunar periods alone only correlated with peak catches 52% of the time. However, when a major period coincided with a moving tide (either rising or falling), the success rate skyrocketed to 78%. Even more revealing, minor periods that occurred during a strong spring tide current often outperformed major periods that fell during slack water. The study also noted that baitfish activity noticeably increased in the 90 minutes *before* a major period, suggesting the solunar influence affects the entire food chain progressively.
The takeaway is clear: the tide provides the opportunity (moving water and bait), and the solunar period acts as a “feeding trigger” that encourages fish to take advantage of that opportunity. The following Tidal Priority Matrix helps visualize how to combine these two data sets to score potential feeding windows and select the best strategy.
| Solunar Period | Tidal Phase | Current Flow | Feeding Score (1-10) | Target Strategy |
|---|---|---|---|---|
| Major Period | Rising Tide | Strong (2+ knots) | 10/10 | Aggressive lures, fast retrieves |
| Major Period | Slack Tide | None | 5/10 | Slow bottom presentations |
| Minor Period | Rising Tide | Moderate (1-2 knots) | 7/10 | Natural bait drift |
| Minor Period | Slack Tide | None | 3/10 | Target structure, shade |
| Negative Period | Peak Current | Strong | 6/10 | Current breaks only |
| Negative Period | Slack Tide | None | 1/10 | Consider moving locations |
Why Braided Line Casts Farther Than Monofilament of the Same Strength?
An angler’s connection to the fish begins with the line, and in the coastal system, casting distance is paramount. The ability to reach a distant trough, a channel edge, or a nervous school of baitfish is often the difference between success and failure. This is where braided line offers a decisive physical advantage over traditional monofilament. The reason isn’t just one factor, but a combination of properties that results in superior energy transfer.
At its core, a cast is about converting the potential energy stored in a bent rod into kinetic energy that propels the lure. Every bit of stretch, air resistance, or friction in the system bleeds away that energy, reducing distance. As Jose Chavez of Wired2Fish explains, “Monofilament’s stretch absorbs casting energy like a shock absorber, while braid’s near-zero stretch allows for 100% energy transfer from the rod blank to the lure, resulting in higher exit velocity.” This difference is quantifiable; fishing line physics testing demonstrates that a 20lb braided line with a thin 0.23mm diameter consistently casts up to 35% farther than a 20lb monofilament line with a much thicker 0.45mm diameter.
The thinner diameter of braid not only cuts through the air with less resistance but also creates less friction as it flies through the rod guides. Furthermore, braid has virtually zero “memory,” meaning it flies off the spool in a straight line rather than in coils like monofilament, which further robs the cast of momentum. This combination of factors ensures that more of the power you generate with the rod is delivered directly to the lure.
The following table breaks down the key physical properties that give braided line its casting superiority. Understanding these principles allows an angler to select the right tool for the job when maximum distance is a strategic necessity.
| Physical Property | 8-Strand Braid | Monofilament | Impact on Casting |
|---|---|---|---|
| Stretch Factor | 3-5% | 15-30% | Braid transfers >95% of rod energy to lure |
| Air Resistance Coefficient | 0.15 | 0.32 | Less drag = higher line speed |
| Guide Friction | Low (smooth surface) | Moderate (larger diameter) | Braid loses less speed through guides |
| Water Absorption | Zero | 3-4% by weight | Mono gets heavier and limper when wet |
| Memory Retention | None | High (coils) | Braid flies straighter off the spool |
| Optimal Rod Loading | Fast action blanks | Moderate action | Different energy transfer curves |
Key Takeaways
- Tidal velocity (spring vs. neap tides) is a more critical indicator of feeding behavior than simple tide height.
- Fish location is often a direct and predictable response to changes in environmental factors like salinity and current that a tide tracker can read.
- Your gear’s performance—from line choice to drag settings—must be scientifically optimized to handle the powerful physical forces of the tidal environment.
How to Adjust Spinning Reel Drag to Stop Line Breakage on Large Fish?
After successfully navigating the tidal system, choosing the right location, and making the perfect cast, the final, critical friction point is the fight itself. This is where the drag system of your reel becomes the most important piece of equipment you own. An improperly set drag is the number one cause of lost trophy fish. Too loose, and the fish can run into structure; too tight, and the line snaps under a sudden surge. The solution is not to guess, but to apply a scientific, repeatable method for setting your drag pressure.
The industry standard is the 25-30% rule. This principle states that your drag should be set to slip at a pressure equal to 25-30% of your line’s breaking strength. For example, if you are using 20lb test line, your drag should be set to slip between 5 and 6 pounds of pressure. This provides enough force to tire the fish and control its head, while leaving a 70% safety margin to absorb the shock of powerful runs, head shakes, and tail beats. This setting must be done with a scale, as “feel” is notoriously unreliable.
However, the initial setting is only half the battle. During a long fight with a powerful fish like a kingfish or tarpon, the friction in the drag washers generates intense heat. This heat can cause “drag fade,” where the drag washers lose their ability to apply consistent pressure.
Case Study: Drag Heat Fade in Extended Kingfish Battles
Data from the 2024 Southern Kingfish Association tournament revealed drag fade becomes critical after 12 minutes of continuous runs. High-quality carbon fiber drag washers maintained 85% of their initial pressure after a 20-minute fight, while traditional felt washers dropped to just 45% efficiency. Anglers who used a “pumping” technique—lifting the rod and then reeling down—allowed their drags 3-second cooling intervals between runs, which proved crucial in maintaining performance during battles that lasted over 45 minutes with 50+ pound kingfish.
To ensure you’re prepared for that fish of a lifetime, follow this precise protocol for setting your drag before you ever leave the dock.
- Attach a handheld scale: Tie a quality handheld fishing scale to your line using a secure loop knot.
- Assume fighting position: Hold the rod at a 45-degree angle, simulating a real fight. Do not pull straight from the reel.
- Measure the slip point: Pull on the scale slowly and steadily until the drag begins to slip. Note the reading on the scale.
- Calculate your target: Determine 25-30% of your line’s rated breaking strength (e.g., for 20lb line, the target is 5-6 lbs).
- Adjust and re-test: Tighten or loosen the drag knob in small increments, re-testing with the scale until it consistently slips at your target pressure.
- Mark your setting: Once set, use a waterproof marker or a small piece of tape to mark the position of your drag knob for a quick and reliable field reference.
The next time you consult a tide chart, don’t just see numbers and times. See the system. Analyze the forces at play, from tidal velocity to salinity gradients, and predict the outcomes. By shifting your mindset from guessing to tracking, you transform luck into a repeatable strategy. Your next trophy fish isn’t a matter of chance; it’s waiting for you to solve the puzzle.